VXLANネットワーク構築例 マルチキャスト編
Posted on 2014/05/09(Fri) 03:53 in technical
さまりー
VXLANネットワークを構築する際のサンプルコンフィグレーション マルチキャスト編。
openvswitchの持つVXLAN機能ではなく、Linux kernelで作ったVXLANポートをopenvswitchに接続するだけです。
環境構成には、GNS3とVirtualBoxを使用します。
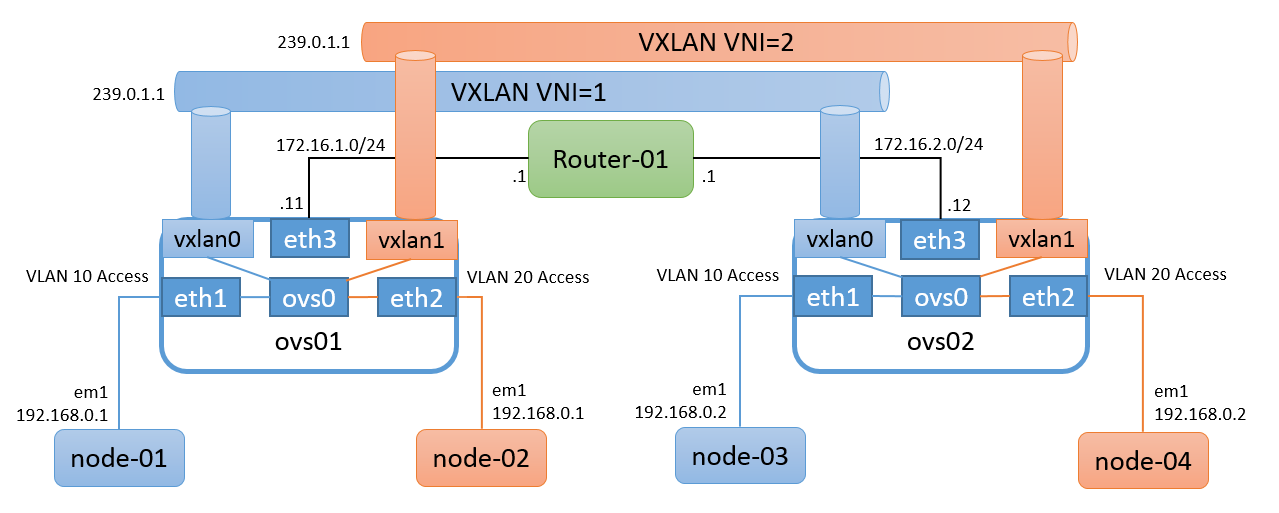
環境構成図
図のようなGNS3+VirtualBox環境をもとに、VXLANネットワークを作ります。ユニキャストの時と大体同じです。

openvswitchのバージョンだけちょっと上がってますけど、特にこれでなきゃいけないというものでもないです。
登場人物:
Router-01 : BSDRP 1.5 on VirtualBox
node-01 : BSDRP 1.5 on VirtualBox
node-02 : BSDRP 1.5 on VirtualBox
node-03 : BSDRP 1.5 on VirtualBox
node-04 : BSDRP 1.5 on VirtualBox
ovs01 : Ubuntu-12.04.4 + openvswitch-2.1.0 on VirtualBox
ovs02 : Ubuntu-12.04.4 + openvswitch-2.1.0 on VirtualBox
通報
OSとopenvswitchはインストール済みと言うことで先に進みます。
構築予定図
図のようなVXLANネットワークを構築しましょー
VXLANの設定準備
Linux kernelがVXLANをするには、Cで直接VXLANを扱うか、iproute2(ubuntuのパッケージ名はiproute)のipコマンドから設定する方法があるのですが、普通に後者を選択するだろ、常識的に考えて...
まず、iproute2がvxlanを使えるようになったのがいつなのか、チラッと確認しておきます。
えーと、2012-10-01にvxlan supportって書いてあるから、少なくともそれ以降のビルドだと可能性あるよね。
と言うわけで、ubuntuのiproute2がVXLANを扱えるか確認してみます。が、20111117-1ubuntu2.1とか書いてあるし無理そうだ。:
$ cat /etc/lsb-release
DISTRIB_ID=Ubuntu
DISTRIB_RELEASE=12.04
DISTRIB_CODENAME=precise
DISTRIB_DESCRIPTION="Ubuntu 12.04.4 LTS"
$ dpkg -s iproute | grep Version
Package: iproute
Status: install ok installed
Multi-Arch: foreign
Priority: required
Section: net
Installed-Size: 982
Maintainer: Ubuntu Developers <ubuntu-devel-discuss@lists.ubuntu.com>
Architecture: amd64
Version: 20111117-1ubuntu2.1
Provides: arpd
Depends: libc6 (>= 2.14), libdb5.1
Recommends: libatm1
Suggests: iproute-doc
Conflicts: arpd
Conffiles:
 /etc/iproute2/rt_realms 7137bdf40e8d58c87ac7e3bba503767f
 /etc/iproute2/rt_protos 95ce0b4b5b79f5a8a45941fb418a904c
 /etc/iproute2/rt_dsfield 4264d5c7c8298300185aa04e1a736934
 /etc/iproute2/rt_scopes 6298b8df09e9bda23ea7da49021ca457
 /etc/iproute2/ematch_map 0b9befbbbee4b415319b8070f18b9b88
 /etc/iproute2/group 3aea2c0e0dd75e13a5f8f48f2936915f
 /etc/iproute2/rt_tables a1313318d6778fe6b8c680248ef5a463
Description: networking and traffic control tools
 The iproute suite, also known as iproute2, is a collection of
 utilities for networking and traffic control.
 .
 These tools communicate with the Linux kernel via the (rt)netlink
 interface, providing advanced features not available through the
 legacy net-tools commands 'ifconfig' and 'route'.
Homepage: http://www.linux-foundation.org/en/Net:Iproute2
Original-Maintainer: Debian iproute maintainers <ah-iproute@debian.org>
一応、ip linkコマンドにvxlanオプションが見えるかも確認してみるけど、TYPEにvxlanが無いのでやっぱり無理そう。:
$ ip link help
Usage: ip link add [link DEV] [ name ] NAME
                   [ txqueuelen PACKETS ]
                   [ address LLADDR ]
                   [ broadcast LLADDR ]
                   [ mtu MTU ]
                   type TYPE [ ARGS ]
       ip link delete DEV type TYPE [ ARGS ]

       ip link set { dev DEVICE | group DEVGROUP } [ { up | down } ]
                          [ arp { on | off } ]
                          [ dynamic { on | off } ]
                          [ multicast { on | off } ]
                          [ allmulticast { on | off } ]
                          [ promisc { on | off } ]
                          [ trailers { on | off } ]
                          [ txqueuelen PACKETS ]
                          [ name NEWNAME ]
                          [ address LLADDR ]
                          [ broadcast LLADDR ]
                          [ mtu MTU ]
                          [ netns PID ]
                          [ netns NAME ]
                          [ alias NAME ]
                          [ vf NUM [ mac LLADDR ]
                                   [ vlan VLANID [ qos VLAN-QOS ] ]
                                   [ rate TXRATE ] ]
                          [ master DEVICE ]
                          [ nomaster ]
       ip link show [ DEVICE | group GROUP ]

TYPE := { vlan | veth | vcan | dummy | ifb | macvlan | can | bridge }
iproute2をソースからインストールしてもいいんだけど、カーネルソースとか要求されるのも面倒だし、Cloud Tools Archiveを利用しよう。
インストール手順はこんな感じ。:
$ sudo apt-get install python-software-properties
$ sudo add-apt-repository cloud-archive:tools
$ sudo apt-get update
$ sudo apt-get install iproute
改めてip link helpを確認。:
$ ip link help
Usage: ip link add [link DEV] [ name ] NAME
                   [ txqueuelen PACKETS ]
                   [ address LLADDR ]
                   [ broadcast LLADDR ]
                   [ mtu MTU ]
                   [ numtxqueues QUEUE_COUNT ]
                   [ numrxqueues QUEUE_COUNT ]
                   type TYPE [ ARGS ]
       ip link delete DEV type TYPE [ ARGS ]

       ip link set { dev DEVICE | group DEVGROUP } [ { up | down } ]
                          [ arp { on | off } ]
                          [ dynamic { on | off } ]
                          [ multicast { on | off } ]
                          [ allmulticast { on | off } ]
                          [ promisc { on | off } ]
                          [ trailers { on | off } ]
                          [ txqueuelen PACKETS ]
                          [ name NEWNAME ]
                          [ address LLADDR ]
                          [ broadcast LLADDR ]
                          [ mtu MTU ]
                          [ netns PID ]
                          [ netns NAME ]
                          [ alias NAME ]
                          [ vf NUM [ mac LLADDR ]
                                   [ vlan VLANID [ qos VLAN-QOS ] ]
                                   [ rate TXRATE ] ]
                                   [ spoofchk { on | off} ] ]
                          [ master DEVICE ]
                          [ nomaster ]
       ip link show [ DEVICE | group GROUP ] [up]

TYPE := { vlan | veth | vcan | dummy | ifb | macvlan | can |
          bridge | ipoib | ip6tnl | ipip | sit | vxlan }
TYPEにvxlanがあるし、大丈夫そう。
警告
今となっては最新版ではないので非常にどうでもいいことだが、linux-image-3.8.0-34-genericを使用している場合は、multicast vxlanはカーネルパニックの可能性があるので回避すべきです。
Configuration
router-01
ifconfig em1 172.16.1.1/24 up
ifconfig em2 172.16.2.1/24 up
service pimdd onestart
node-01
ifconfig em1 192.168.0.1/24 up
node-02
ifconfig em1 192.168.0.1/24 up
node-03
ifconfig em1 192.168.0.2/24 up
node-04
ifconfig em1 192.168.0.2/24 up
ovs01
面倒なのでrootで作業します。:
sudo su -
for i in `seq 0 5`; do ip link set up eth${i}; done
ip addr flush dev eth3
ip addr add 172.16.1.11/24 dev eth3
ip route add 172.16.2.0/24 via 172.16.1.1
ip link add vxlan1 type vxlan id 1 group 239.0.1.1 ttl 10 dev eth3
ip link add vxlan2 type vxlan id 2 group 239.0.1.1 ttl 10 dev eth3
ip link set up vxlan1
ip link set up vxlan2
for br in `ovs-vsctl list-br`; do ovs-vsctl del-br ${br}; done
ovs-vsctl add-br ovs0
ovs-vsctl add-port ovs0 eth1 tag=10
ovs-vsctl add-port ovs0 eth2 tag=20
ovs-vsctl add-port ovs0 vxlan1 tag=10
ovs-vsctl add-port ovs0 vxlan2 tag=20
警告
デフォルトのvxlanインタフェースのTTLは1なので、間にルータが挟まる場合はちゃんとTTLを増やしておきましょう。
ovs02
ovs01とeth3の設定以外は一緒:
sudo su -
for i in `seq 0 5`; do ip link set up eth${i}; done
ip addr flush dev eth3
ip addr add 172.16.2.12/24 dev eth3
ip route add 172.16.1.0/24 via 172.16.2.1
ip link add vxlan1 type vxlan id 1 group 239.0.1.1 ttl 10 dev eth3
ip link add vxlan2 type vxlan id 2 group 239.0.1.1 ttl 10 dev eth3
ip link set up vxlan1
ip link set up vxlan2
for br in `ovs-vsctl list-br`; do ovs-vsctl del-br ${br}; done
ovs-vsctl add-br ovs0
ovs-vsctl add-port ovs0 eth1 tag=10
ovs-vsctl add-port ovs0 eth2 tag=20
ovs-vsctl add-port ovs0 vxlan1 tag=10
ovs-vsctl add-port ovs0 vxlan2 tag=20
設定確認
ovs01
# ovs-vsctl show
df9a4a09-f1b8-42a3-80e5-708377f68142
    Bridge "ovs0"
        Port "eth1"
            tag: 10
            Interface "eth1"
        Port "vxlan1"
            tag: 10
            Interface "vxlan1"
        Port "ovs0"
            Interface "ovs0"
                type: internal
        Port "eth2"
            tag: 20
            Interface "eth2"
        Port "vxlan2"
            tag: 20
            Interface "vxlan2"
    ovs_version: "2.1.0"
# ip -d link show vxlan1
10: vxlan1: <BROADCAST,MULTICAST,UP,LOWER_UP> mtu 1450 qdisc noqueue master ovs-system state UNKNOWN mode DEFAULT
    link/ether 56:3f:5b:5f:83:7f brd ff:ff:ff:ff:ff:ff promiscuity 1
    vxlan id 1 group 239.0.1.1 dev eth3 port 32768 61000 ttl 10 ageing 300
# ip -d link show vxlan2
11: vxlan2: <BROADCAST,MULTICAST,UP,LOWER_UP> mtu 1450 qdisc noqueue master ovs-system state UNKNOWN mode DEFAULT
    link/ether 36:ea:79:6f:b3:19 brd ff:ff:ff:ff:ff:ff promiscuity 1
    vxlan id 2 group 239.0.1.1 dev eth3 port 32768 61000 ttl 10 ageing 300
ovs02
# ovs-vsctl show
df9a4a09-f1b8-42a3-80e5-708377f68142
    Bridge "ovs0"
        Port "vxlan2"
            tag: 20
            Interface "vxlan2"
        Port "ovs0"
            Interface "ovs0"
                type: internal
        Port "vxlan1"
            tag: 10
            Interface "vxlan1"
        Port "eth1"
            tag: 10
            Interface "eth1"
        Port "eth2"
            tag: 20
            Interface "eth2"
    ovs_version: "2.1.0"
# ip -d link show vxlan1
10: vxlan1: <BROADCAST,MULTICAST,UP,LOWER_UP> mtu 1450 qdisc noqueue master ovs-system state UNKNOWN mode DEFAULT
    link/ether 1e:52:85:ad:f8:34 brd ff:ff:ff:ff:ff:ff promiscuity 1
    vxlan id 1 group 239.0.1.1 dev eth3 port 32768 61000 ttl 10 ageing 300
# ip -d link show vxlan2
11: vxlan2: <BROADCAST,MULTICAST,UP,LOWER_UP> mtu 1450 qdisc noqueue master ovs-system state UNKNOWN mode DEFAULT
    link/ether 26:ad:c8:20:46:e6 brd ff:ff:ff:ff:ff:ff promiscuity 1
    vxlan id 2 group 239.0.1.1 dev eth3 port 32768 61000 ttl 10 ageing 300
動作確認
ovs01
VXLANのマルチキャストグループを239.0.1.1にしたので、"link 01:00:5e:00:01:01"が追加されていればオッケー:
#  ip maddr show dev eth3
5:      eth3
        link  01:00:5e:00:00:01
        link  33:33:00:00:00:01
        link  01:00:5e:00:01:01
        inet  239.0.1.1
        inet  224.0.0.1
        inet6 ff02::1
        inet6 ff01::1
ovs02
# ip maddr show dev eth3
5:      eth3
        link  01:00:5e:00:00:01
        link  33:33:00:00:00:01
        link  01:00:5e:00:01:01
        inet  239.0.1.1
        inet  224.0.0.1
        inet6 ff02::1
        inet6 ff01::1
router-01
# tcpdump -i em1 -s 65535 -w /tmp/multicast-vxlan_router-01_em1.pcap
node-01
疎通も問題なさそう:
# ping -c 20 192.168.0.2
PING 192.168.0.2 (192.168.0.2): 56 data bytes
64 bytes from 192.168.0.2: icmp_seq=0 ttl=64 time=5.546 ms
64 bytes from 192.168.0.2: icmp_seq=1 ttl=64 time=1.131 ms
64 bytes from 192.168.0.2: icmp_seq=2 ttl=64 time=1.436 ms
64 bytes from 192.168.0.2: icmp_seq=3 ttl=64 time=1.558 ms
64 bytes from 192.168.0.2: icmp_seq=4 ttl=64 time=1.258 ms
64 bytes from 192.168.0.2: icmp_seq=5 ttl=64 time=1.385 ms
64 bytes from 192.168.0.2: icmp_seq=6 ttl=64 time=1.549 ms
64 bytes from 192.168.0.2: icmp_seq=7 ttl=64 time=1.713 ms
64 bytes from 192.168.0.2: icmp_seq=8 ttl=64 time=1.588 ms
64 bytes from 192.168.0.2: icmp_seq=9 ttl=64 time=1.515 ms
64 bytes from 192.168.0.2: icmp_seq=10 ttl=64 time=1.866 ms
64 bytes from 192.168.0.2: icmp_seq=11 ttl=64 time=1.657 ms
64 bytes from 192.168.0.2: icmp_seq=12 ttl=64 time=1.789 ms
64 bytes from 192.168.0.2: icmp_seq=13 ttl=64 time=1.628 ms
64 bytes from 192.168.0.2: icmp_seq=14 ttl=64 time=1.646 ms
64 bytes from 192.168.0.2: icmp_seq=15 ttl=64 time=1.495 ms
64 bytes from 192.168.0.2: icmp_seq=16 ttl=64 time=1.547 ms
64 bytes from 192.168.0.2: icmp_seq=17 ttl=64 time=1.219 ms
64 bytes from 192.168.0.2: icmp_seq=18 ttl=64 time=1.612 ms
64 bytes from 192.168.0.2: icmp_seq=19 ttl=64 time=1.775 ms

--- 192.168.0.2 ping statistics ---
20 packets transmitted, 20 packets received, 0.0% packet loss
round-trip min/avg/max/stddev = 1.131/1.746/5.546/0.891 ms
node-02
node-01とほぼ同時にpingを実行しているけど、特に問題なく疎通できてる:
# ping -c 20 192.168.0.2
PING 192.168.0.2 (192.168.0.2): 56 data bytes
64 bytes from 192.168.0.2: icmp_seq=0 ttl=64 time=4.398 ms
64 bytes from 192.168.0.2: icmp_seq=1 ttl=64 time=2.044 ms
64 bytes from 192.168.0.2: icmp_seq=2 ttl=64 time=1.737 ms
64 bytes from 192.168.0.2: icmp_seq=3 ttl=64 time=1.865 ms
64 bytes from 192.168.0.2: icmp_seq=4 ttl=64 time=1.604 ms
64 bytes from 192.168.0.2: icmp_seq=5 ttl=64 time=1.118 ms
64 bytes from 192.168.0.2: icmp_seq=6 ttl=64 time=1.462 ms
64 bytes from 192.168.0.2: icmp_seq=7 ttl=64 time=1.740 ms
64 bytes from 192.168.0.2: icmp_seq=8 ttl=64 time=1.510 ms
64 bytes from 192.168.0.2: icmp_seq=9 ttl=64 time=1.541 ms
64 bytes from 192.168.0.2: icmp_seq=10 ttl=64 time=1.528 ms
64 bytes from 192.168.0.2: icmp_seq=11 ttl=64 time=1.385 ms
64 bytes from 192.168.0.2: icmp_seq=12 ttl=64 time=1.552 ms
64 bytes from 192.168.0.2: icmp_seq=13 ttl=64 time=1.503 ms
64 bytes from 192.168.0.2: icmp_seq=14 ttl=64 time=1.662 ms
64 bytes from 192.168.0.2: icmp_seq=15 ttl=64 time=1.747 ms
64 bytes from 192.168.0.2: icmp_seq=16 ttl=64 time=1.661 ms
64 bytes from 192.168.0.2: icmp_seq=17 ttl=64 time=1.612 ms
64 bytes from 192.168.0.2: icmp_seq=18 ttl=64 time=1.646 ms
64 bytes from 192.168.0.2: icmp_seq=19 ttl=64 time=1.517 ms

--- 192.168.0.2 ping statistics ---
20 packets transmitted, 20 packets received, 0.0% packet loss
round-trip min/avg/max/stddev = 1.118/1.742/4.398/0.636 ms
router-01
マルチキャストグループの状態(残念ながら、この出力はすぐ消えちゃう):
# netstat -g

IPv4 Virtual Interface Table
 Vif   Thresh   Local-Address   Remote-Address    Pkts-In   Pkts-Out
  0         1   172.16.1.1                             14          2
  1         1   172.16.2.1                             14          2

IPv4 Multicast Forwarding Table
 Origin          Group             Packets In-Vif  Out-Vifs:Ttls
 172.16.2.12     239.0.1.1              14    1    0:1
 172.16.1.11     239.0.1.1              14    0    1:1


IPv6 Multicast Interface Table is empty

IPv6 Multicast Forwarding Table is empty
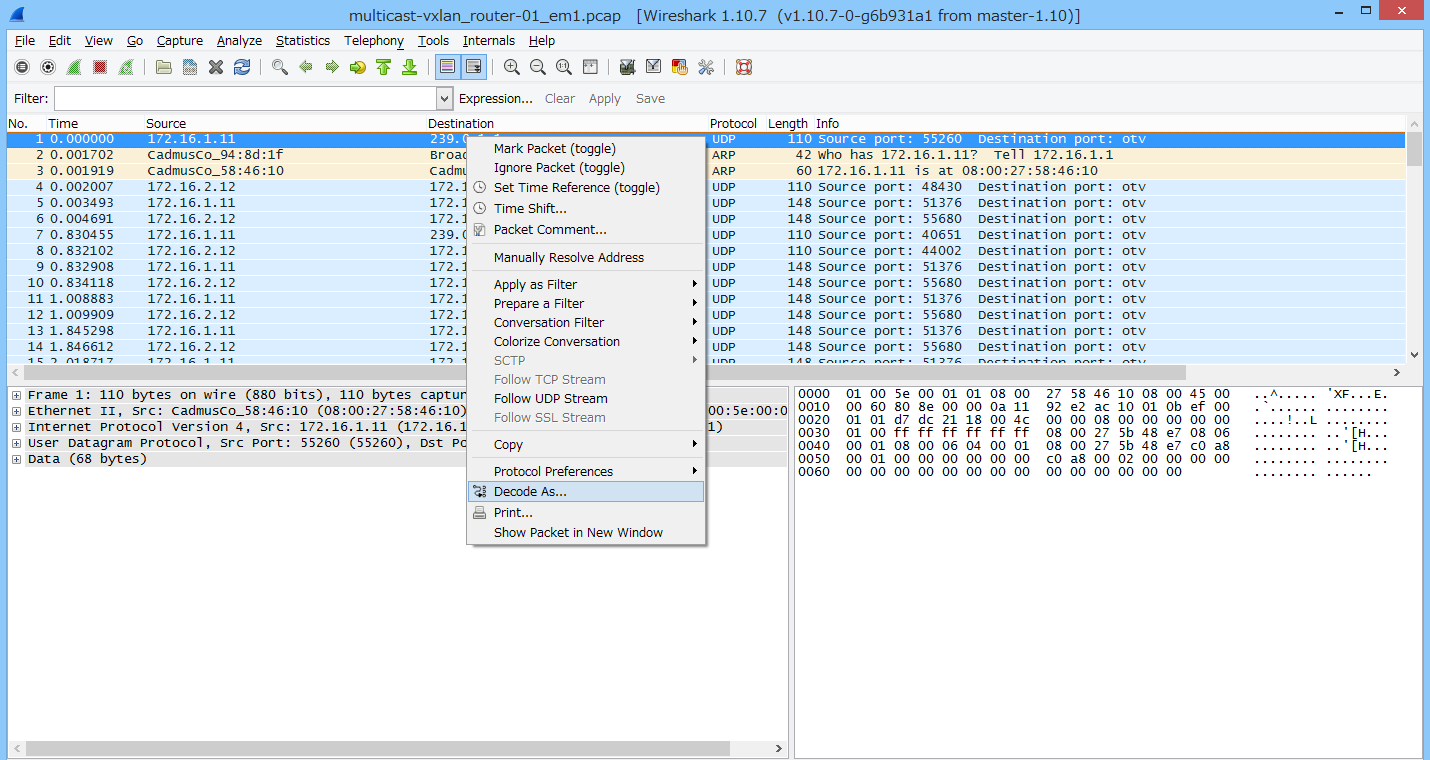
結果確認
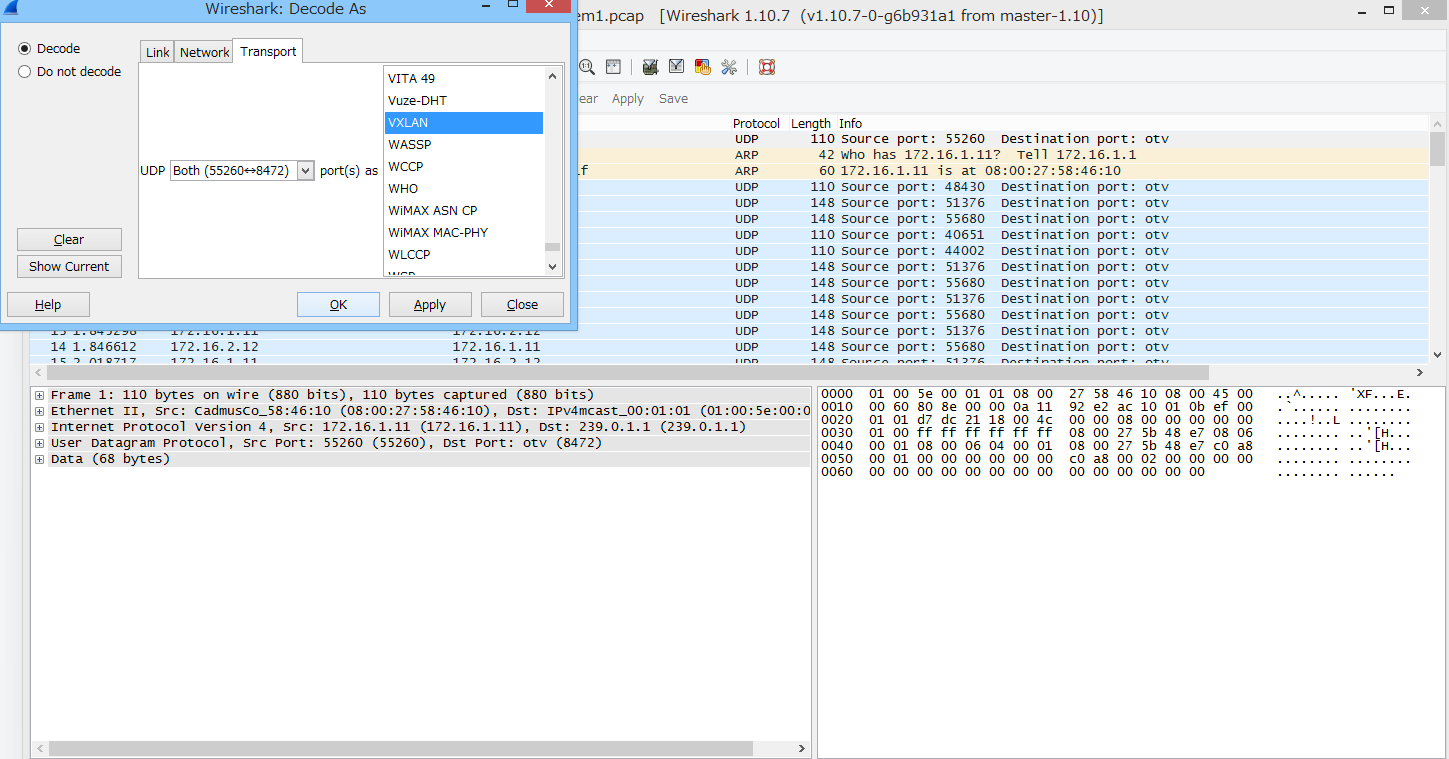
wireshark氏にお任せする。
こんな感じでデコードします。
VNI=1の 192.168.0.1 <-> 192.168.0.2
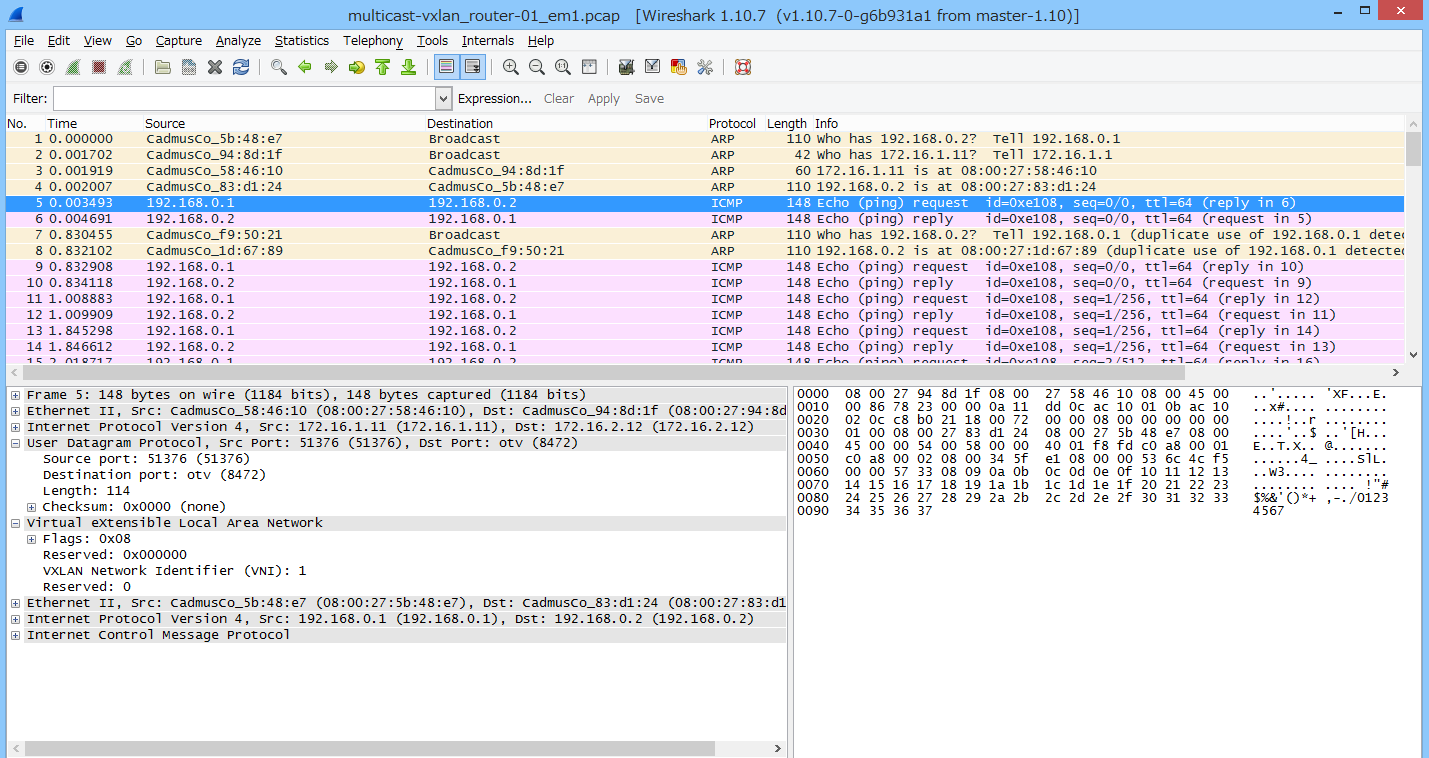
VNI=2の 192.168.0.1 <-> 192.168.0.2
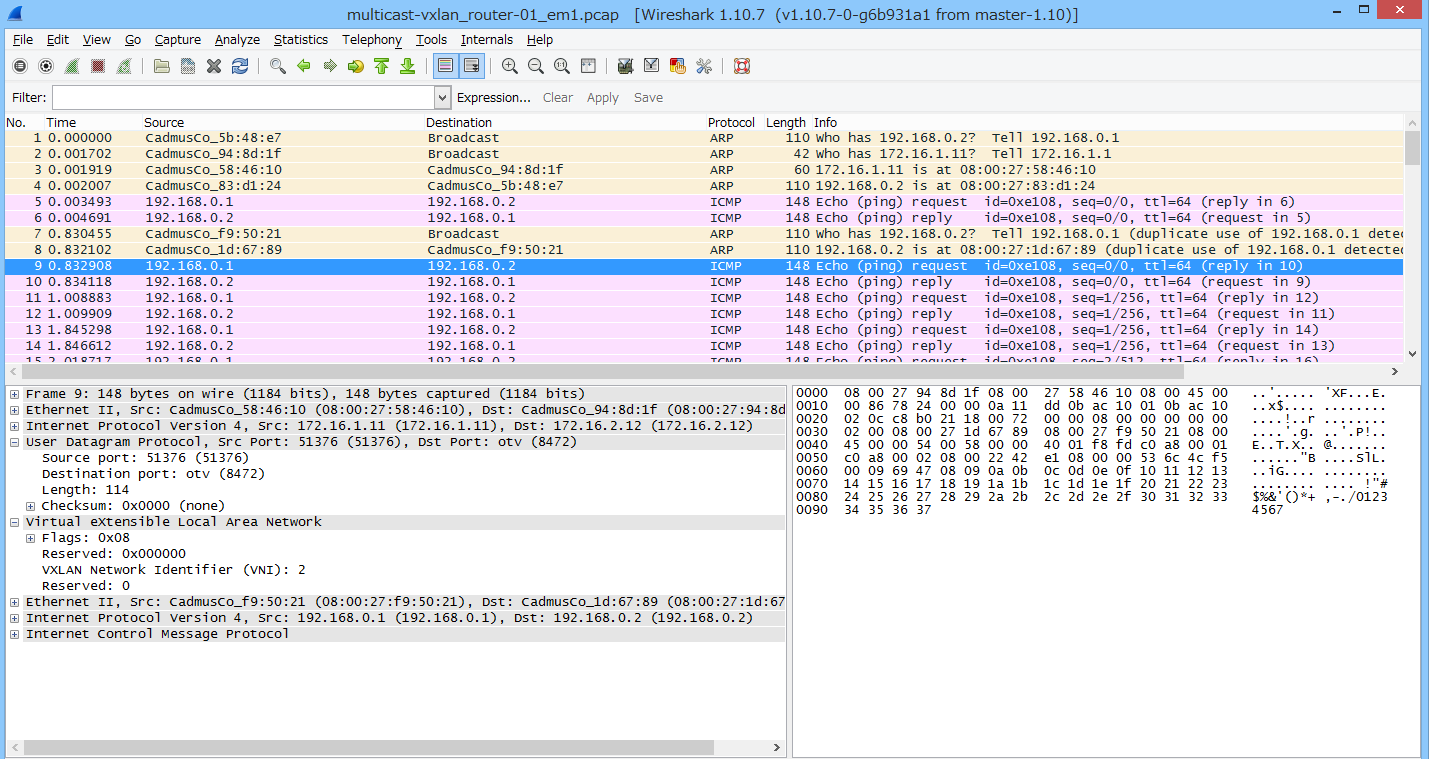
はい、うまいことIsolationされました。
特に、今回はブロードキャストフレームがマルチキャストに、その後のユニキャストフレームはユニキャストでカプセル化されているところが重要ですの。
マルチキャストを使わずに、ユニキャストトンネルだけを使用する場合(すなわち、openvswitchのVXLAN実装のみを使用する場合)、 拠点が3つ以上になると、フルメッシュトンネルを設定した時点でブロードキャストが複数のユニキャストパケットとなってループを発生させてしまいますが、 ブロードキャスト、マルチキャスト、あて先不明ユニキャストの各フレームをマルチキャストでカプセル化する場合は、その問題を回避することが出来ます。
ただし、途中経路がマルチキャストに対応する必要があるため、途中経路の設定を一切変更できずマルチキャストに対応できない場合は、openvswitchとOpenFlowによるループ防止フローを各自で挿入する必要があると考えられます。
ちなみに、今回取得したpcapファイルはこちらです。 : https://www.ainoniwa.net/data/pcap/multicast-vxlan_router-01_em1.pcap